
-
help@lennox-it.uk
-
(+44) 01773 570028

- 23
Nov
Archiving Large SharePoint Libraries by Modified Date using Power Automate
EDIT Dec 21 – In the article below we say that the solution works with libraries which have exceed the “maximum list view item threshold” (SharePoint’s internal item cap). In testing, we still encountered a lot of problems trying to use Power Automate so eventually we switched to a PowerShell solution which worked a lot better. Please see our updated blog post for the PowerShell solution.
(tldr; the solution is at the bottom of this article if you want to skip the blurb. I’d recommend reading the caveats first though)
The Blurb
Recently we had a requirement to archive old files from a large SharePoint document library in an effort to bring it under control. The library has already sailed through the ‘maximum view threshold’ and was continuing to grow on a weekly basis by 10s of gigabytes.
A brief Google search turned up nothing; no in-built function as part of O365 or third-party tool and the solutions I found for Power Automate all seemed to be geared around smaller deployments or very specific archiving scenarios.
Our requirements were quite simple. We wanted to archive all files over a certain age out of our target library. Any solution had to be able to handle the large size of the library and the fact that is has exceeded the max view threshold. We also wanted to archive the files out to a new library which mirrored the original folder structure. This second requirement seemed like an obvious one to me but nothing that I could fine online seemed to work this way.
Caveats
As with all things SharePoint there are some limitations / caveats with this approach:
- It is very important that you set a “Top Count” under ‘Get Items’. From what I’ve read, the ‘Apply to each’ function will only perform a maximum 5000 iterations and so this is what I’ve used. Even if we weren’t using an Apply to each, because of the SharePoint library exceeding the maximum view threshold we still need a value here or else the function will not return any results. Because of this, the routine will only process [5000] items at a time. If you have a large amount of items to archive then the job will need to be run and re-run multiple times to get them all.
- Presumably due to the library being too big, the “Limit Entries to Folder” option under ‘Get Items’ doesn’t work and setting any value here will cause the function to return no items. This means that the process can only be run against the whole SharePoint library though it might be possible to tweak the ‘Filter Query’ to add further control over what is archived. Be aware though that in most cases even valid queries will return no results due to max view threshold
- Get File Content / Create File has a file size limit of about 1gb. In most cases if you’re dealing with general office documents and pictures this shouldn’t be a problem but the process will fail if it encounters any file exceeding this limit.
Solution Part1: Enable Modified Index on Sharepoint Library
I’m not sure how important this step is but before starting in Power Automate I’d recommend creating a new Index column on the SharePoint library for the Modified Date. You can do this by going to the library settings and clicking “Indexed columns” under the columns settings and select “Create a new index”.
It might take several hours for this to fully initialize so if you’re not having any luck returning values with Get Items, try leaving it and coming back to it the next day.
Solution Part 2: Power Automate Routine
Below is the Power Automate process in full.
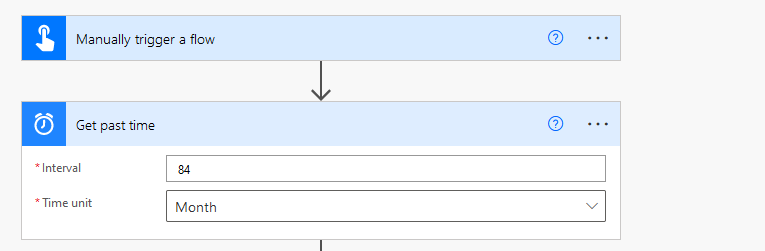
- Get past time (which controls the age of documents to be archived)
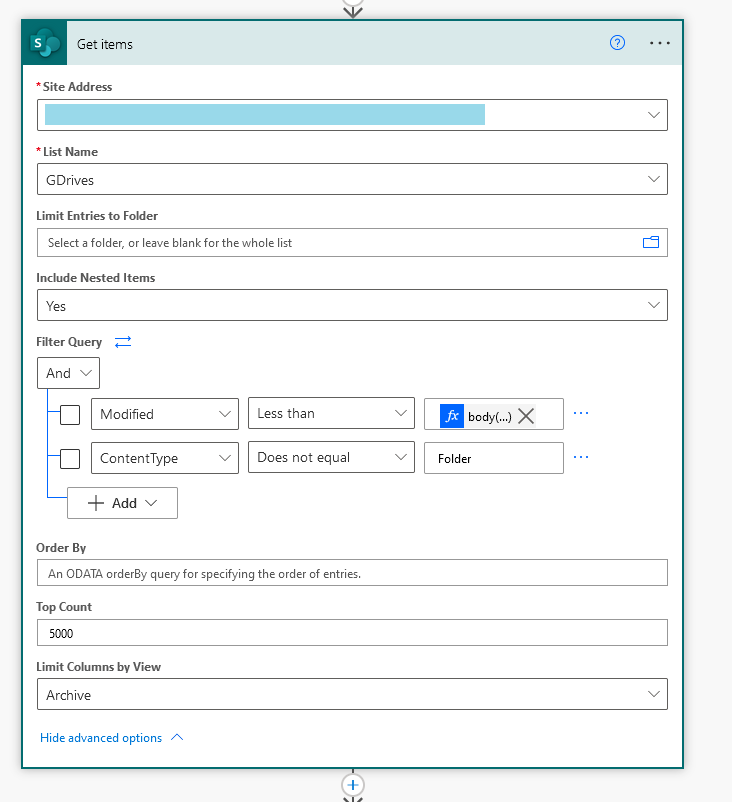
- Get items
- Filter Query is (Modified lt ‘@{body(‘Get_past_time’)}’) and (ContentType ne ‘Folder’)
- Limit Columns by view – not sure if this is 100% required but I created a view with only the basic columns in there to try and speed it up. You can leave this as default/none if you like

- Apply to Each – operate on ‘value’ from Get items step
- ‘test’ is the name of my archive library. You should use whatever name you’ve given to your archive here
- Note that the backup is made to a folder under ‘test’ named after your library. So for example in my routine above a folder called ‘GDrives’ is created in the root of ‘test’ and all the files are saved under here. In this way, you could backup multiple source folders to a single archive.
- [AtE] Create new folder
- Specify archive destination and use “Folder Path” value from Get items as Folder Path
- [AtE] Get file content
- Specify source and use “Identifier” from Get items as File Identifier
- [AtE] Create file
- Specify archive destination for site
- Folder path is ‘test/@{items(‘Apply_to_each’)?[‘{Path}’]}’ where ‘test’ is the name of my Archive library
- File name is “File name with extension” from Get items
- File Content is “File Content” from Get file content
- [Ate] Delete File
- As we’re moving out of the source location, I use a delete here using the source site and the Identifier again to remove it from source library.
- If running multiple batches of the process then this step is also important to stop the same files being picked up every single run.
And that’s it. Hope this helps and if your business needs help with a SharePoint management then feel free to contact us.